
• JP Precision Glass is the leading glass shower doors company in Chicago

Author Archives: jp-admin

Technician marking wall bracket placements on tile

The DIY Bathtub Glass Enclosure Installation Guide for Clean Results

Planning and Measuring Before Your Installation

Before opening any boxes or drilling into your bathroom walls, precision planning is essential. A bathtub enclosure requires tight tolerances. Even a fraction of an inch of variance across your tub opening can result in sliding doors that drift open or gaps where water escapes onto your bathroom floor.

Start by measuring the opening width in three distinct locations:

  • Along the flat tub threshold.
  • At the midpoint of the intended door height (typically around 30 inches up).
  • At the top height where your upper guide rail or wall headers will rest (usually 58 to 60 inches above the threshold).

Take the smallest of these three measurements as your primary reference width when sizing your kit. If your walls are severely out of plumb—more than 3/8 inch from top to bottom—you will need an enclosure kit designed with adjustable wall profiles or custom-cut glass to compensate.

Next, examine your tub deck. Most modern sliding and fixed enclosures require a flat, level threshold width of at least 2-3/4 inches. If your tub’s outer rim curves sharply inward or lacks a flat resting area, hardware clips and water-deflection strips cannot sit flush.

Checking vertical plumb is just as critical. Hold a 4-foot level against both side walls where the glass or wall jambs will mount. If the bubble is not dead-center, note which way the wall leans. Knowing your wall profile helps you decide between a fully framed system, a semi-frameless sliding rail, or how to choose the perfect glass tub enclosure tailored to your bathroom’s exact geometry.
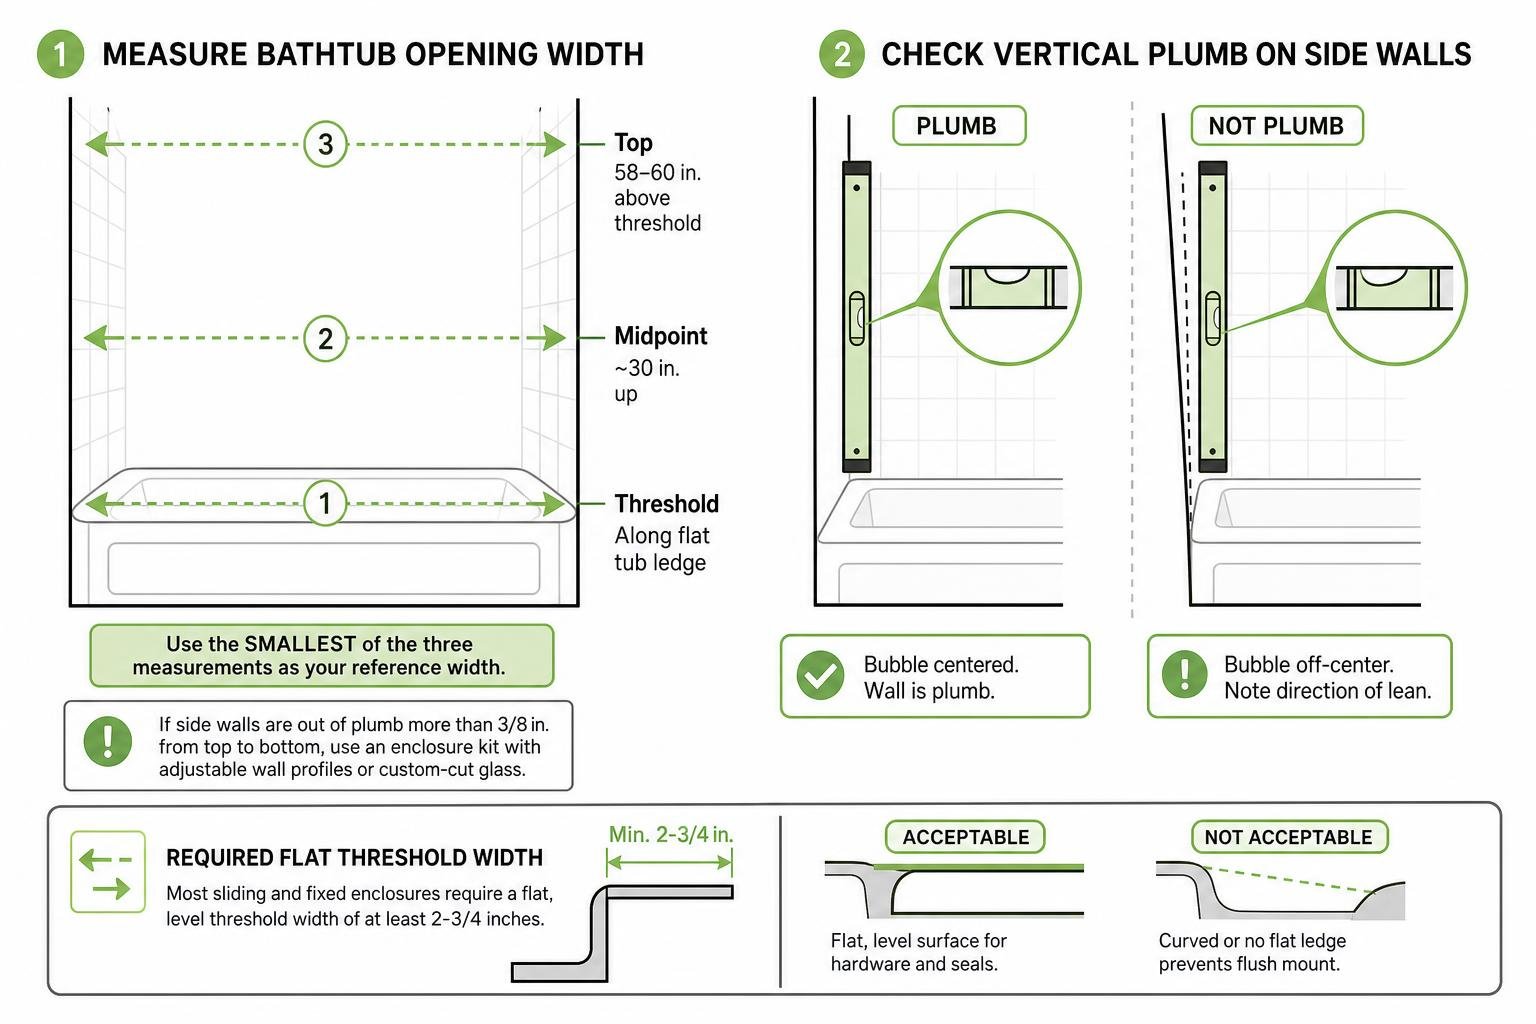
Measuring bathtub opening and checking vertical plumb on shower walls

Essential Tools and Prep for Your Bathtub Glass Enclosure Install

Gathering the right tools before you begin prevents mid-project scrambles that risk damaging heavy glass panels. Standard household tools are not enough; drilling into porcelain tile or marble requires specialized bits, while handling tempered glass panels demands proper safety gear.

Tool / Equipment Purpose Key Specification / Tip
Diamond / Carbide Drill Bits Drilling anchor holes in wall finishes 1/8″, 1/4″, and 5/16″ masonry/tile bits; use water cooling
4-Foot Aluminum Level Checking threshold and wall plumb Must be rigid and verified accurate
Glass Suction Cups Lifting and positioning heavy glass panels Dual-pad suction lifters rated for at least 100 lbs
Cut-Resistant Gloves & Goggles Personal protection during handling ANSI-rated safety glasses and Level 3+ grip gloves
Rubber Mallet Tapping wall jambs and anchors flush Non-marring white or grey rubber head
100% Sanitary Silicone Sealant Waterproofing joints and perimeter glass Anti-microbial, kitchen-and-bath formulation
Hacksaw / Metal Chop Saw Trimming aluminum or stainless upper guide rails 32 TPI hacksaw blade or fine-tooth metal cutting wheel
Painter’s Masking Tape Marking drill locations and protecting surfaces Blue delicate-surface painter’s tape

Clear the entire bathroom of rugs, decorative items, and toiletries. Lay thick moving blankets or heavy cardboard over the tub interior and across the bathroom floor to create safe landing zones. Tempered glass should never rest directly on bare tile, porcelain, or metal.

Fiberglass vs. Tile Wall Structural Considerations

The substrate behind your tub surround dictates how you anchor the enclosure. The two most common wall surfaces—fiberglass/acrylic units and hard tile—handle structural loads differently.

Fiberglass and Acrylic Surrounds: A fiberglass tub wall flexes slightly under pressure. Because of this flex, you cannot rely on standard hollow-wall plastic anchors. For fiberglass surrounds, structural studs must sit directly behind the panel mounting locations. When sliding doors roll across the top track, they exert dynamic shear forces that pull outward and downward against the top wall brackets. Fastening into bare fiberglass without stud backing will crack the gelcoat and pull the hardware loose over time.

Tiled Walls (Ceramic, Porcelain, Natural Stone): Tile over cement backer board offers a firm, rigid surface. Use a diamond hole saw or carbide masonry bit run at low speeds. Keep the bit wet with a water spray bottle to prevent overheating, which can crack the surrounding tile. Once through the tile and backer board, drive your mounting screws directly into the wall studs whenever possible.

If you are dealing with tight spaces where a full enclosure might feel too heavy, exploring partial glass tub enclosures can give you an open look while reducing the overall mounting footprint on your walls.

Step-by-Step Bathtub Glass Enclosure Install Guide

Installing a glass enclosure requires a methodical, step-by-step approach. Follow this sequence carefully to ensure a secure, watertight setup. For model-specific details and dimensional checks, consult the manufacturer’s detailed shower enclosure installation guide.

Measuring and Trimming the Guide Rail

Most top-hung sliding enclosures use an aluminum or stainless steel overhead guide rail that spans the full width of the opening. Because tub alcoves vary, these rails often come slightly oversized and must be cut to fit your specific opening.

  1. Measure the exact wall-to-wall distance at the rail’s mounting height.
  2. Deduct the manufacturer’s specified clearance allowance (typically 1/8 to 1/4 inch overall) to accommodate wall mounting brackets and end caps.
  3. Apply blue painter’s tape around the cut line on the metal rail to protect the finish from scratches and chipping.
  4. Cut the rail square using a fine-tooth hacksaw (32 TPI) or a metal-cutting chop saw equipped with a non-ferrous blade.
  5. Use a metal deburring tool or fine metal file to remove all burrs and sharp edges from the cut end. A clean, smooth edge ensures the rail slides fully into the wall mounting brackets.

Taking the time to trim the rail precisely prevents binding, which is why sliding glass tub enclosures operate with such effortless, quiet gliding when installed correctly.

Setting Fixed Glass Panels and Mounting Hardware

Once the upper track and wall brackets are prepared, you can set the stationary glass panel.

  1. Mark the Base and Wall Locations: Place the bottom floor clip or channel onto the tub threshold, aligned with your layout line. Hold the fixed panel wall clips against the wall, check plumb with your 4-foot level, and mark the screw holes through the tape.
  2. Drill and Anchor: Drill pilot holes through your marked tile or fiberglass locations. Insert wall anchors if you are not hitting direct timber studs, or drive stainless steel screws directly into structural backing.
  3. Position Rubber Setting Blocks: Place the supplied clear neoprene or rubber setting blocks inside the bottom threshold clips and wall brackets. Never let the glass edge contact metal hardware directly.
  4. Set the Fixed Panel: With two people using suction lifters, carefully lift the stationary panel and rest it onto the setting blocks in the floor bracket. Slide the vertical edge into the wall clips. Reference the manufacturer’s fixed panel mounting specifications to ensure clip spacing and torque limits match engineered safety guidelines.
  5. Plumb and Secure: Check the panel for plumb along its vertical leading edge. Tighten the clamping screws through the brackets until snug, making sure the rubber gaskets cushion the glass on both sides.

If your layout calls for a minimalist fixed barrier rather than a full sliding system, installing a bathtub glass half door follows this same secure mounting process.

Hanging and Aligning the Sliding Glass Door

With the stationary panel locked into place and the overhead guide rail anchored securely, you are ready to hang the sliding door.

  1. Attach Roller Assemblies: Bolt the upper roller wheels to the pre-drilled holes near the top edge of the sliding glass panel. Ensure the clear plastic protective sleeves are inside the glass holes so the metal bolts never touch the interior glass edges.
  2. Mount the Panel: Have your helper assist you in lifting the sliding panel inside the tub alcove. Carefully hoist the roller wheels up and set them onto the overhead track.
  3. Engage the Floor Guide: While supporting the glass, feed the bottom edge of the sliding panel into the bottom floor guide mounted on the threshold. This guide prevents the door from swinging in or out during travel.
  4. Adjust Roller Cams: Most quality rollers feature eccentric mounting shafts. Rotating these shafts with an Allen wrench raises or lowers either side of the door, allowing you to square the door edge perfectly against the wall jamb or rubber bumper seal.
  5. Fasten Anti-Jump Pins: Screw the anti-jump disks or pins into the bottom of the roller brackets beneath the rail. These safety pins prevent the door from accidentally jumping off the track during vigorous sliding.
  6. Set Door Stoppers and Handle: Slide the rubber-cushioned rail stoppers to the desired open and closed limits and tighten their set screws. Finally, mount the door handle or towel bar, ensuring all plastic washers are seated on both sides of the glass.

Critical Safety Practices and Sealing Techniques
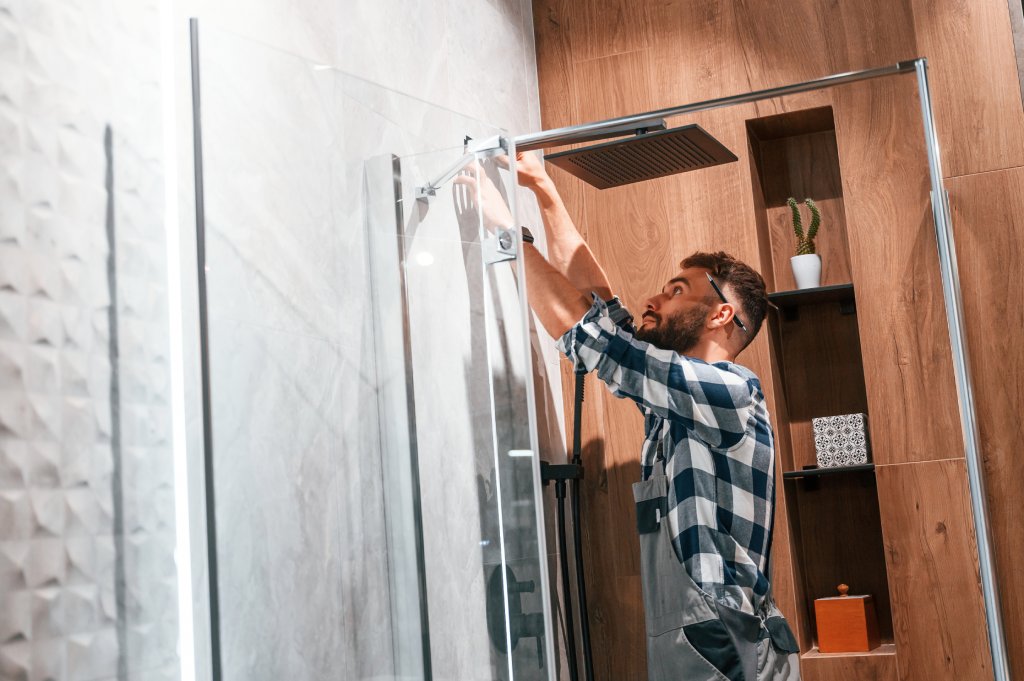
Applying clean silicone bead along the enclosure threshold

A glass enclosure should be both visually striking and structurally sound. Water containment depends entirely on proper seal positioning and high-grade silicone work.

Tempered Glass Handling and Common Pitfalls

All modern bathtub enclosures use architectural tempered safety glass, certified to SGCC and ANSI Z97.1 standards. Tempered glass is engineered with high surface compression, making it up to five times stronger than standard annealed glass. However, this internal tension makes the perimeter edges—especially the four corners—exceptionally sensitive to impact.

  • Never Rest Glass on Hard Surfaces: Always rest panels on thick cardboard, rubber blocks, or moving blankets. Setting a panel down hard on bare ceramic tile or a metal screw head can chip the corner and cause the entire sheet to shatter instantly into thousands of small, blunt pebbles.
  • Never Force Hardware: If a mounting bolt or bracket hole does not align perfectly, never force, pry, or hammer the hardware through the hole. Adjust the brackets or re-check your wall plumb.
  • Avoid Edge Stress: Spontaneous breakage can occasionally happen hours or days after installation if a panel was installed with internal twist or resting unevenly against metal screws. Ensure all rubber gaskets and setting blocks are seated correctly.

Applying Silicone Sealant and Floor Brackets for Watertight Performance

Once all mechanical adjustments are complete, seal the enclosure against leaks:

  1. Install the Threshold Splash Strip: Clean the tub deck thoroughly with 70% isopropyl alcohol to remove all soap scum, dust, and oils. Dry completely. Lay down the slim aluminum or acrylic anti-splash threshold strip directly beneath the sliding door path, securing it with a thin bead of silicone along its base.
  2. Apply 100% Silicone Sealant: Apply a steady, continuous 1/8-inch bead of 100% sanitary silicone along the outside perimeter where the fixed glass meets the tub deck and side walls.
  3. Seal the Wall Brackets: Caulk around the exterior seams of all wall clips and guide rail mounting brackets.
  4. Do Not Caulk the Inside Bottom Edge: In most configurations, leave the inside bottom edge of the glass panel uncaulked, or follow the manufacturer’s specific weep-hole layout. This allows any water that enters the frame channels to drain naturally back into the bathtub rather than pooling inside the hardware.
  5. Tool the Bead: Smooth the silicone line with a caulk profiling tool or a gloved finger misted with soapy water for a clean, professional finish.

If you want an enclosure that stays crystal clear with minimal upkeep, glass treated with protective hydrophobic coatings can cut routine cleaning time by up to 90% by actively repelling hard water and soap scum. To learn more about modern barrier designs, check out our guide on how a glass bathtub shield simplifies bathroom maintenance.

Frequently Asked Questions About Bathtub Glass Doors

Troubleshooting Wall Anchors During a Bathtub Glass Enclosure Install

What if there is no wall stud behind my mounting bracket location?
When mounting into standard drywall with tile over top and no stud is present, standard plastic ribbed anchors are insufficient for sliding door tracks. Use heavy-duty 1/4-inch stainless steel toggle bolts (such as pull-toggles or snap-toggles) that expand flat against the structural backside of the backer board.

For fiberglass units without backing, the best practice is to open the drywall on the reverse side of the wall during rough-in to install horizontal 2×4 or 2×6 wood blocking between the studs. If the wall is already closed, high-strength structural toggle anchors paired with commercial-grade mounting tape behind the jamb can handle the shear load, though you should always verify that your hardware setup satisfies the enclosure’s warranty guidelines.

How Long Does Silicone Need to Cure Before Using the Shower?

While silicone sealant may become skin-dry to the touch within 1 to 2 hours, it takes a minimum of 24 hours to set and 36 to 48 hours to fully cure and achieve maximum tensile strength and water resistance. Exposing fresh silicone to hot water, high humidity, or chemical soaps before the 36-hour mark can cause the sealant bead to soften, blister, turn cloudy, and pull away from the tub deck, leading to hidden leaks behind your walls.

Which Side Should the Sliding Door Panel Be Positioned?

As a general rule, the sliding door panel should be positioned on the same side as the showerhead and controls.

This configuration offers two distinct advantages:

  1. Water Deflection: The overlap between the inner sliding panel and the outer fixed panel points away from the direct water stream, preventing forceful spray from blowing through the vertical center gap.
  2. Easy Access: It allows you to reach in and turn on the water controls to adjust temperature without stepping fully into the tub.

Conclusion

Installing a bathtub glass enclosure transforms your bathroom into an open, modern retreat. With precise measurements, proper diamond drill bits, and careful handling of tempered glass, a DIY install delivers dependable, leak-free results.

If your tub layout features unusual angles, out-of-plumb walls, or you simply prefer a guaranteed custom fit, partnering with experienced professionals is the best way to get long-lasting results. At JP Precision Glass, we design, fabricate, and install custom glass enclosures engineered to the exact dimensions of your space. Explore our innovative 3-panel shower doors for bathtubs to discover flexible layout options tailored to your bathroom remodel.
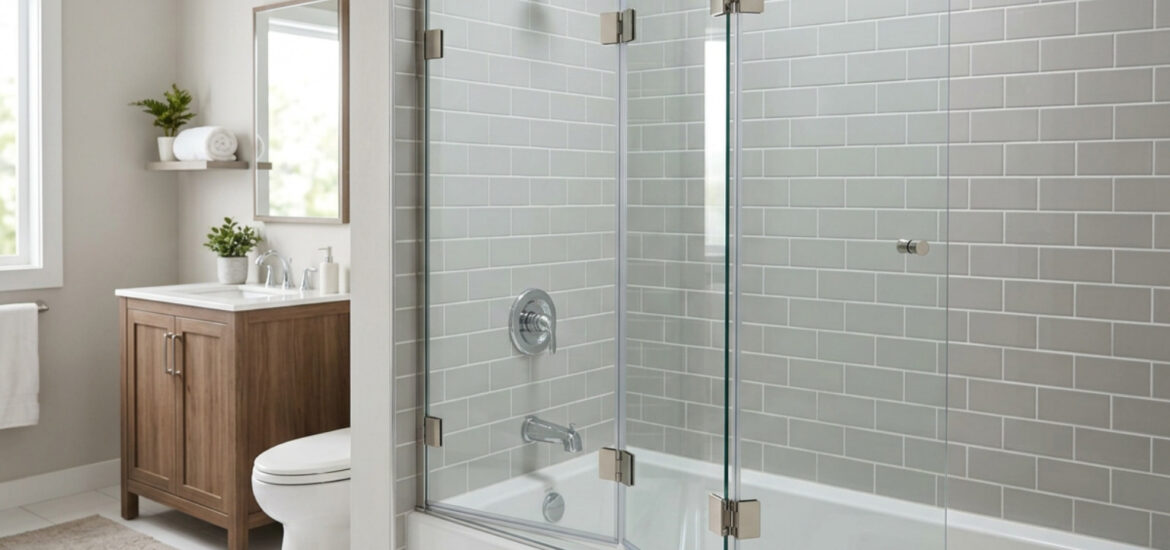
bifold tub enclosure

The Ultimate Guide to Folding and Bifold Tub Doors

Save Space With a Bifold Tub Enclosure

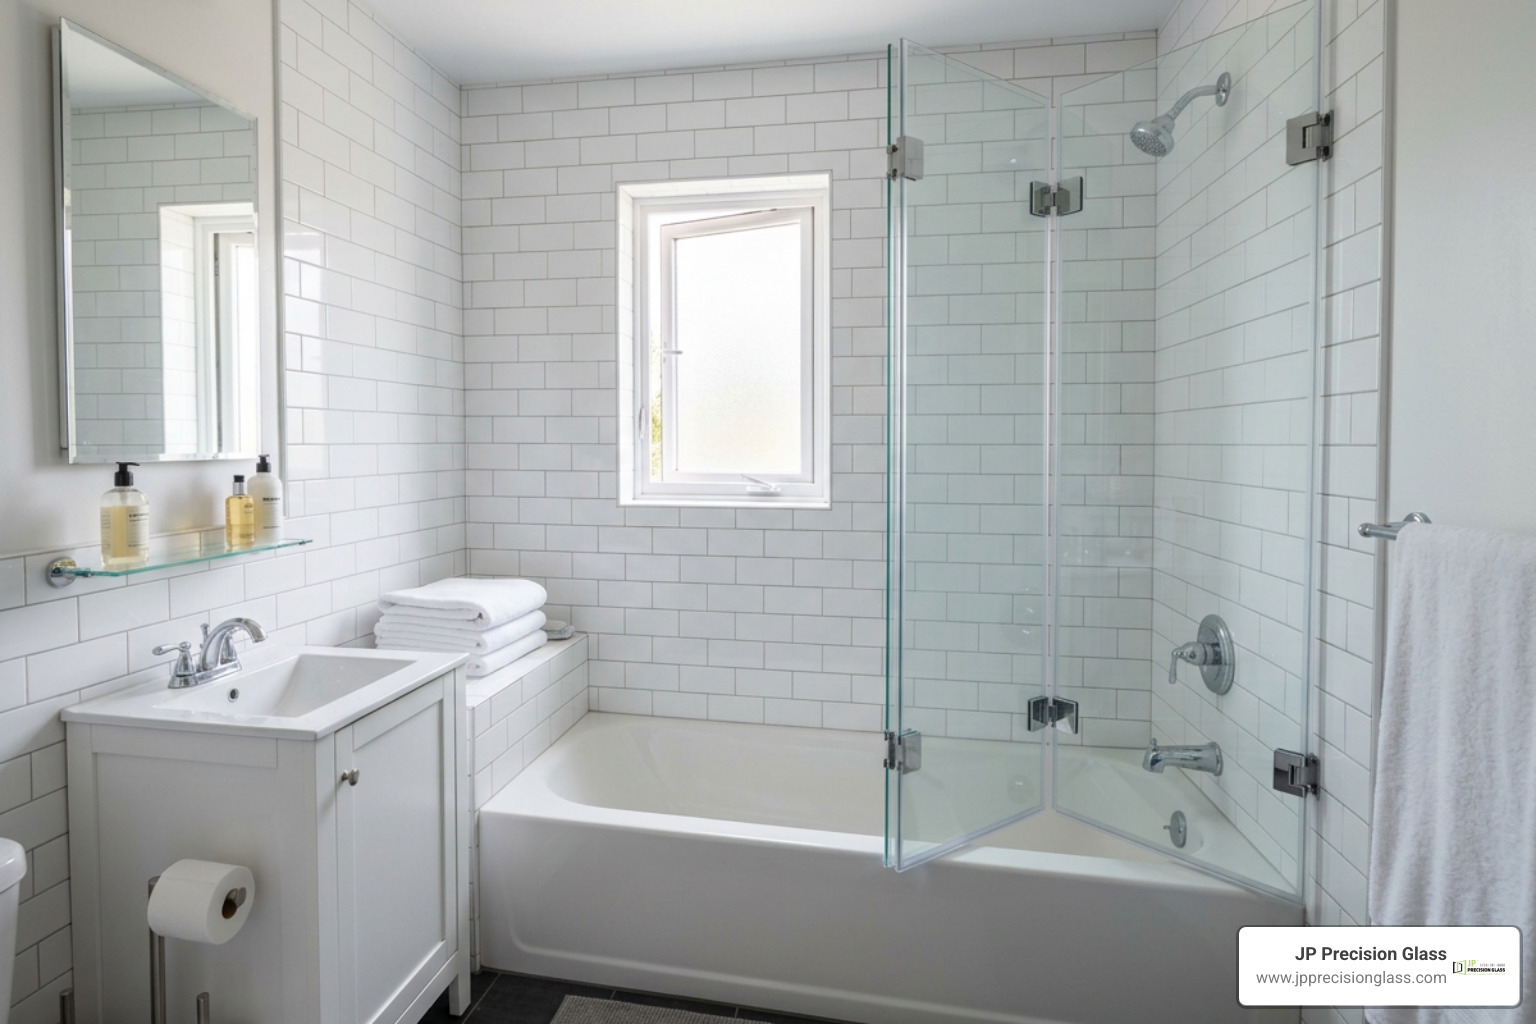
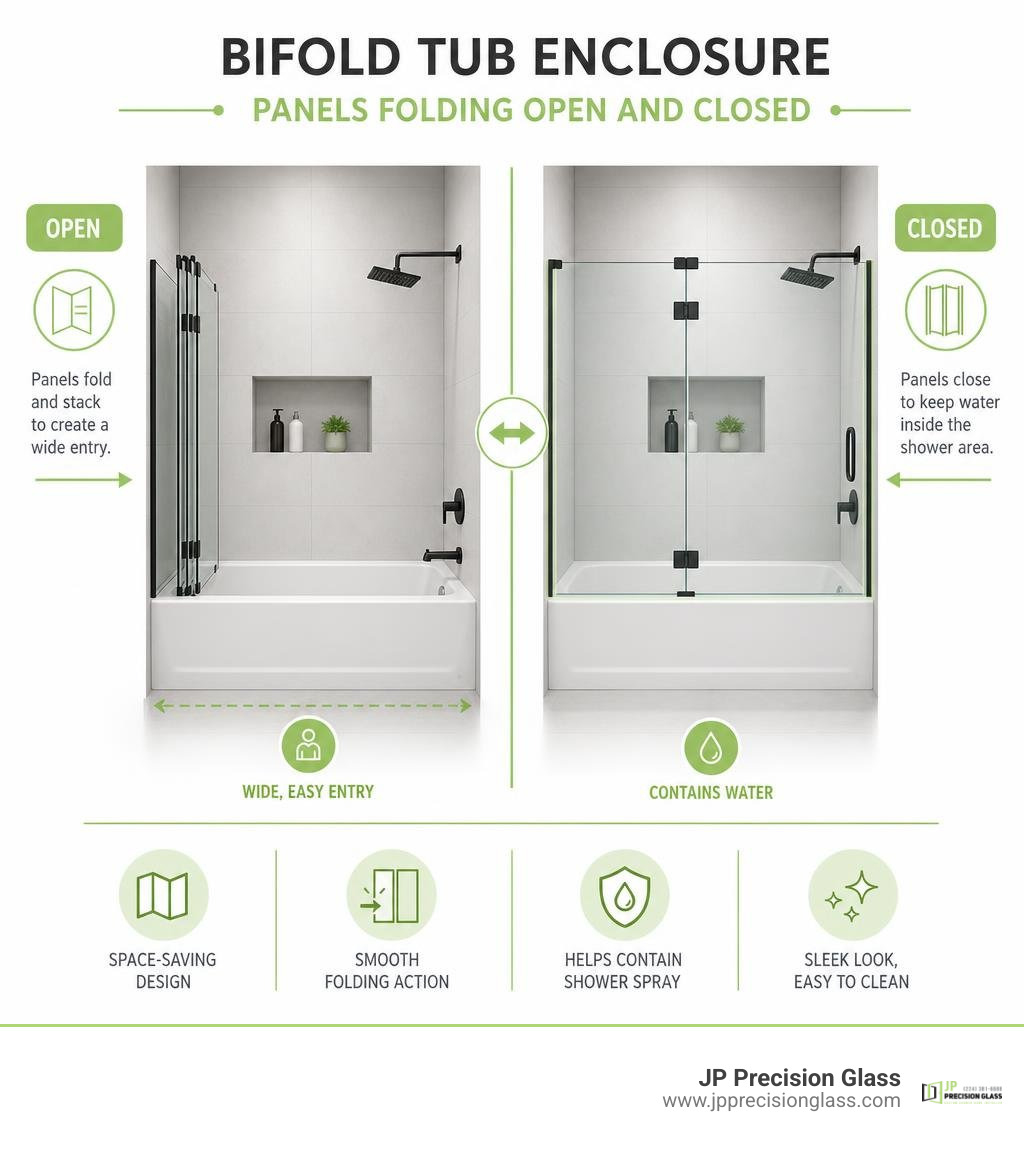
A bifold tub enclosure uses glass panels that fold together instead of swinging far into the room. It is a smart choice when a vanity, toilet, or narrow walkway leaves little clearance beside the tub. When open, the panels stack compactly; when closed, tempered glass and properly fitted seals help contain shower spray.

For a Chicago bathroom remodel, start with three decisions:

  1. Measure the finished tub opening and check whether the walls are level.
  2. Choose a frameless or semi-frameless design, glass thickness, and finish such as chrome, brushed nickel, or matte black.
  3. Plan the fold direction so the panels open away from nearby fixtures and provide a comfortable entry.

Unlike a sliding door, a folding design can create a wider usable opening without requiring a large swing arc. It can also be tailored for alcove tubs and some corner layouts, making it a clean, modern option for compact bathrooms with unusual dimensions.

This guide explains the key designs, sizing, installation needs, accessibility considerations, and simple care steps that keep folding tub doors operating smoothly.

Bifold tub enclosure panels folding open and closed infographic

Related content about bifold tub enclosure:

Why Choose a Bifold Tub Enclosure for Your Bathroom?

Compact bathroom layouts often present serious design puzzles. When square footage is at a premium, traditional shower doors can quickly become an obstacle course. A standard hinged door demands a wide outward radius that frequently collides with toilets or sinks, while standard sliding enclosures restrict entry to only half the tub width.

Folding systems solve these spatial dilemmas through ingenious mechanical articulation. Think of bifold systems as the origami of modern bathroom design: two or more linked glass panels fold neatly against one another along heavy-duty internal pivots. This configuration drastically cuts down the footprint required to access your tub and shower area. When you transform your space with modern bathroom shower glass enclosures, introducing an articulated bifold system delivers full walk-in accessibility alongside a clean, contemporary aesthetic.

Feature / Door Type Bifold Tub Door Sliding Bypass Door Single Hinged Pivot Door
Clear Opening Width 70% – 85% of total opening Max 45% – 50% of tub span 100% of door panel width
Outward Clearance Needed Minimal (panels fold inward/flat) Zero exterior floor clearance Full arc of door width (24″–36″)
Bottom Track Required? Optional / Low-profile guide Yes (collects water and grime) No (bottom sweeps only)
Best For Tight bathrooms, compact layouts Long tubs, standard alcoves Expansive, spacious master baths
Aesthetic Style Sleek, architectural, Euro-style Traditional or industrial modern Ultra-minimalist frameless

Maximizing Small Bathroom Space with a Bifold Tub Enclosure

In a compact footprint, every fractional inch matters. If your bathroom layout places the vanity counter or toilet within arm’s reach of the bathtub curb, an outward-swinging door is out of the question.

A compact bathroom with an open folding tub door stacked neatly

Bifold systems eliminate this conflict entirely. Because the dual-panel structure hinges in the center and can fold inward toward the tub enclosure walls, you never have to worry about bumping expensive fixtures or blocking traffic paths. When folded open against the interior tile, the panels sit virtually flush against the perimeter wall. This provides homeowners with a sweeping, barrier-free entryway that simplifies bathing children, washing pets, or stepping in and out of a soothing bath.

Comparing Bifold Doors to Sliding and Traditional Pivot Doors

When evaluating different glass doors, weighing functionality against daily maintenance is critical. Sliding bypass systems are a common builder-grade solution, but they come with two notable drawbacks:

  1. Fixed Obstruction: A bypass system traps you into only having one half of the tub open at any given time, making bathing or cleaning the back wall awkward.
  2. Track Build-Up: Sliding doors rely on deep bottom tracks that easily accumulate soap scum, mineral deposits, and stagnant water.

Single pivot doors eliminate the track hassle, but their sweeping swing arc monopolizes precious floor space. If you are debating between fixed screens and articulated glass, exploring the pros and cons of a bathtub glass half door highlights how stationary glass can sometimes limit your reach. Bifold configurations bridge this divide: they combine the open expanse of a pivot door with the compact spatial profile of a slider, keeping water strictly inside the tub perimeter.

Key Design Features and Configuration Options

Selecting the right enclosure requires matching engineering performance with your personal design aesthetic. Folding doors are engineered in both frameless and semi-frameless architectures:

  • Frameless Bifold Doors: These rely on heavy, ultra-clear glass panels connected by precision brass hinges and minimal wall clamps. They offer unobstructed sightlines, making even the smallest bathroom feel significantly larger.
  • Semi-Frameless Bifold Doors: These utilize slim, high-grade perimeter framing made from aluminum alloy 6463. This architectural alloy is polished before anodizing to provide exceptional corrosion resistance and rigid support, paired with clean, low-metal visual lines.

When evaluating multi-panel folding hardware, exploring why 3 panel shower doors for bathtubs are a total game changer reveals how additional folding leaves can span wider alcove openings without sacrificing stability.

Designing a Custom Bifold Tub Enclosure for Alcove and Corner Layouts

While standard three-wall alcoves are the most frequent setting for tub-shower combinations, bifold assemblies adapt gracefully to custom corner footprints as well.

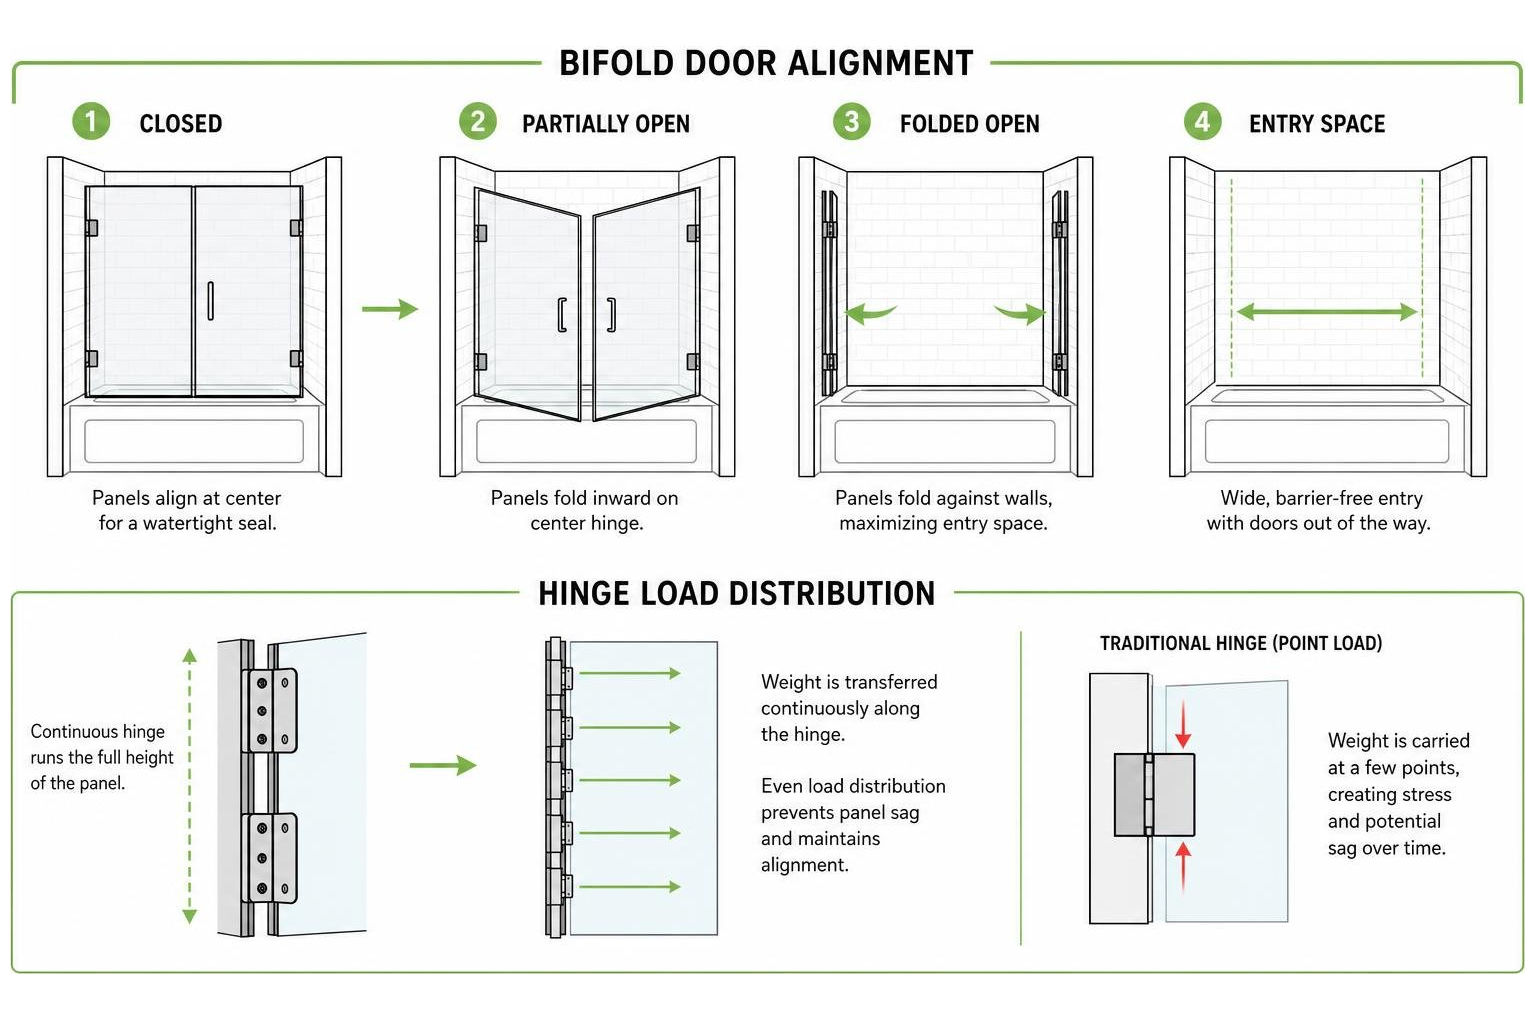
For corner configurations, a folding door connects with a stationary 90-degree glass return panel via continuous watertight gaskets. Continuous hinge systems distribute the weight of the glass evenly along the wall profile, eliminating panel sag over years of daily operation. Knowing how to choose the perfect glass tub enclosure for your bathroom ensures your selected hinge design accounts for wall plumbness and floor levelness across the entire span.

Hardware, Finishes, and Glass Thickness Selections

Hardware resilience is paramount in humid bathroom environments. Premium bifold systems incorporate heavy-duty brass hinges and hardened nylon roller assemblies paired with stainless steel ball bearings. These components ensure smooth, silent gliding that resists binding over time.

Diagram of bifold door alignment and hinge load distribution

When outfitting your enclosure, you can tailor the glass thickness and metallic finish to coordinate with existing fixtures:

  • Glass Thickness: Standard bifold doors utilize 1/4-inch (6mm) to 3/8-inch (10mm) tempered safety glass. Quarter-inch glass provides a lighter gliding feel ideal for multi-panel semi-frameless setups, while 3/8-inch glass provides structural rigidity for minimalist frameless designs.
  • Finishes: Architectural options include Matte Black, Brushed Nickel, Polished Chrome, and Oil Rubbed Bronze. High-end finishes feature multi-stage electro-static or anodized coatings to prevent flaking and water corrosion. Selecting quality shower glass accessories such as through-glass drilled towel bars and low-profile handles ensures durable day-to-day operation.

Accessibility and Tub Enclosure Integration

Accessibility is a major consideration for modern homeowners and multigenerational households. Folding tub doors offer distinct advantages for accessible bathing because they collapse away to open up the widest possible entry clearance.

When paired with walk-in bathtubs featuring low step-in thresholds, slip-resistant flooring, and gravity-driven dual-drain systems, a folding enclosure facilitates effortless wheelchair transfers and assisted bathing. Unlike fixed glass screens that trap an assistant outside the tub, bifold panels fold completely aside, allowing easy physical access and clear maneuverability.

Installation and Measurement Considerations

Precision measurement is the bedrock of a leak-free, smooth-operating bifold glass installation. Bathtub surrounds rarely feature perfectly square corners or plumb walls. Even slight framing shifts can cause folding panels to bind or leave gaps in water seals.

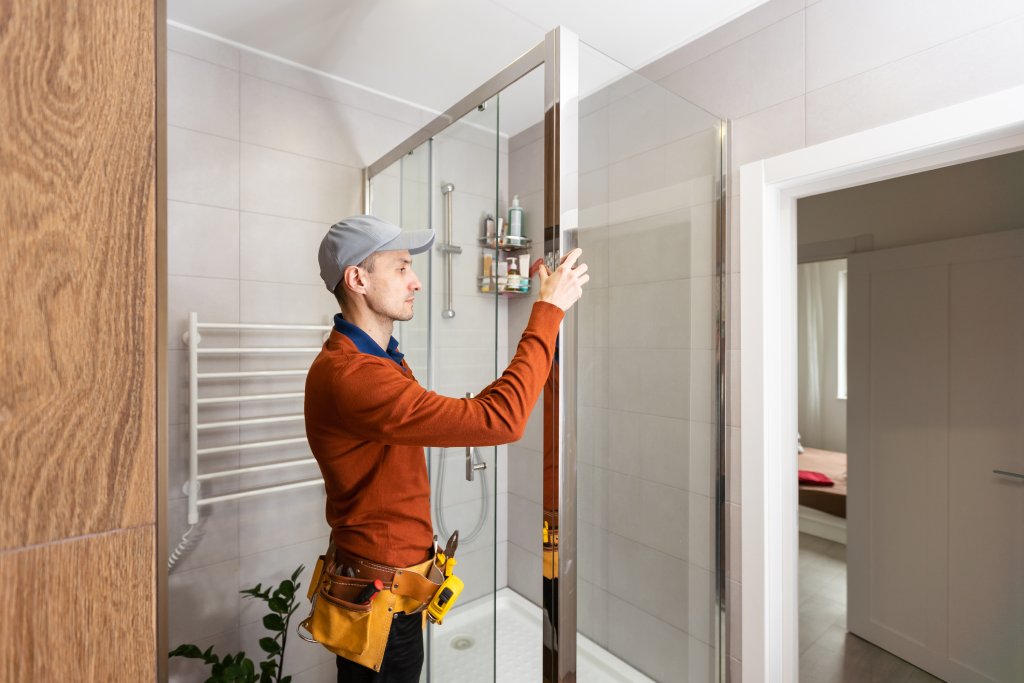
A professional glazier aligning folding door hinges on a tub wall

When preparing an alcove opening:

  1. Measure width across the tub threshold, the midpoint, and the top height opening.
  2. Verify wall plumbness using a 48-inch spirit level or laser level to identify vertical runout.
  3. Check that the tub deck is completely level along its entire length.

Many high-quality semi-frameless bifold systems provide up to 1/2-inch to 1-inch of built-in out-of-plumb adjustment within the wall jambs. Some aluminum frame components can even be cut down up to 4 inches in the field by certified installers to achieve an exact custom fit.

Tools and Preparation for Tub Door Installation

Installing glass enclosures demands careful handling and professional-grade tools:

  • Heavy-duty glass suction cups
  • 48-inch spirit level and laser level
  • Rotary hammer drill with carbide-tipped masonry bits (for ceramic, porcelain, or stone tile)
  • 100% architectural neutral-cure silicone sealant
  • Stainless steel, rust-free mounting fasteners
  • High-grade painter’s tape and rubber setting blocks

Installers anchor structural wall jambs directly into reinforced wall studs behind the tile or acrylic surround. Once the jamb is plumb and anchored, the folding glass panels are hung using heavy-duty hinge pins, followed by careful calibration of vinyl bottom sweeps and magnetic vertical strike seals.

Maintenance, Care, and Long-Term Durability

Maintaining the pristine sparkle of a glass enclosure is straightforward when you incorporate simple daily care habits. Because bifold systems eliminate the deep, dirt-trapping bottom channels found on standard sliding doors, cleaning is significantly faster.

To protect your glass and hardware:

  • Apply a Factory Glass Coating: Hydrophobic glass treatments repel water droplets, preventing dissolved minerals from etching the tempered glass surface.
  • Use a Daily Squeegee Routine: A quick squeegee wipe-down after showering prevents limescale buildup and keeps water spots at bay.
  • Lubricate Hardware: Clean hinge joints and nylon rollers every six months using a silicone-based spray lubricant. Avoid harsh abrasive cleaners or ammonia-based formulas, which can degrade protective anodized finishes and dry out vinyl sweeps.
  • Maintain Track Guides: If your bifold system uses a low-profile bottom guide, occasionally clear away debris so water channels freely back into the tub basin. For broader enclosure care strategies, learning how to install and maintain sliding glass shower doors provides valuable insight into gasket longevity and water-barrier preservation.

Frequently Asked Questions About Bifold Tub Doors

Can a bifold door be installed on any standard bathtub?

Yes. Bifold tub doors are designed to accommodate standard alcove bathtubs measuring between 54 and 60 inches wide, as well as compact 48-inch configurations and extended 72-inch layouts. The only prerequisite is having a flat tub curb surface (typically at least 1.5 to 2 inches wide) and solid framing studs behind the tile to support the hanging weight of the glass panels.

Are bifold tub doors effective at preventing water leaks?

When professionally fitted, bifold enclosures provide excellent water containment. They utilize interlocking vinyl magnetic seals along the closing jamb, flexible continuous water seals between the folding glass leaves, and angled bottom drip sweeps that guide runoff back into the tub pan.

How do bifold shower doors compare in overall investment to sliding doors?

Bifold doors represent an outstanding value by combining the heavy-glass visual appeal of a custom pivot door with the space-saving utility of a slider. Because they require precision hinges, specialized structural hardware, and tempered safety glass engineering, their investment profile is comparable to high-end semi-frameless sliding enclosures, while delivering a much wider walk-in opening.

Conclusion

Upgrading your bathroom layout doesn’t require knocking down structural walls to gain usable space. A folding glass door combines smart spatial ergonomics, premium architectural aesthetics, and robust water protection into a single design element. By tucking neatly out of the way when opened, it creates an airy, uncluttered environment that maximizes every square inch of your bath.

At JP Precision Glass, our specialists fabricate made-to-measure solutions crafted with premium tempered safety glass and architectural-grade hardware. Whether you are remodeling a compact guest bathroom or designing a custom master bath retreat, we help you select and install the ideal configuration for your home. Schedule a consultation for custom shower doors in Chicago with our design team today to explore how folding glass doors can elevate your space.

glass shower enclosure

The Complete Guide to Compare Glass Shower Enclosures

Choose the Right Glass Shower Enclosure for Your Bathroom

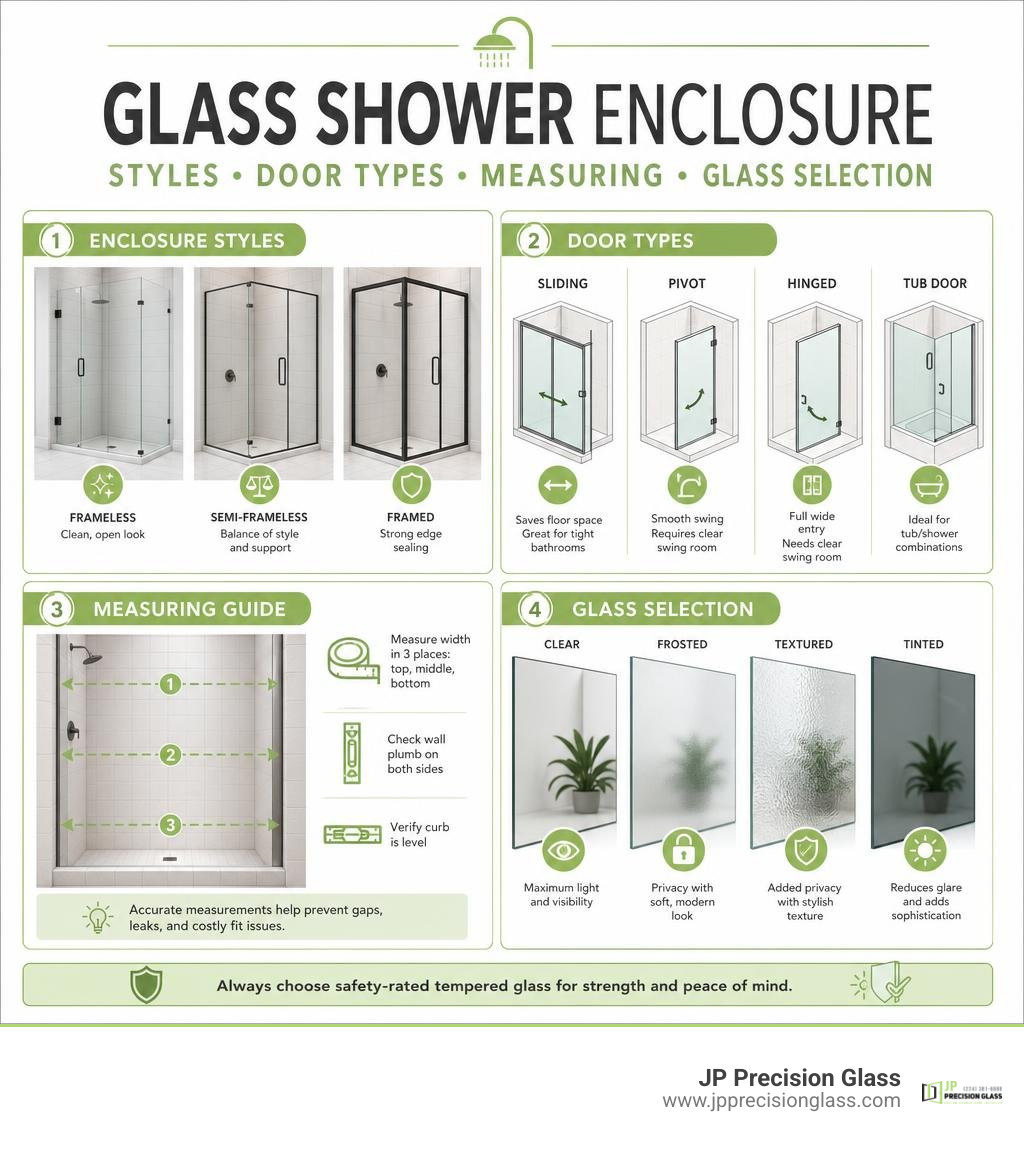
A glass shower enclosure should fit your layout, leave enough room for the door to operate, and use safety-rated tempered glass. Start by choosing a frame style – frameless for a clean, open look, semi-frameless for a balance of style and support, or framed for stronger edge sealing – then match the door to your available space: sliding doors save floor space, while pivot and hinged doors need clear swing room.

For a custom fit, measure the opening width in three places, check wall plumb and curb level, and choose glass texture and hardware that suit your privacy needs and bathroom finish. Professional measurement and installation can prevent gaps, leaks, and costly fit issues, especially in older Chicago homes where walls are rarely perfectly square.

Glass shower enclosure styles, door types, measuring, and glass selection infographic

Must-know glass shower enclosure terms:

Understanding Frame Styles for Your Glass Shower Enclosure

frameless vs semi-frameless vs framed glass shower enclosure structural profiles

Selecting the ideal frame style is often the first major decision in any bathroom redesign. The overall structure dictates not just how the unit looks, but also how light moves across the room, how simple cleaning will be, and how much weight the surrounding walls must support. You can transform your space with modern bathroom shower glass enclosures by pairing the right structural framing with your unique architectural footprint.

Frame styles are broadly divided into three categories: frameless, semi-frameless, and fully framed. Each system relies on different engineering principles to secure the glass panels, contain water, and deliver long-lasting performance.

Frameless Glass Shower Enclosure Options

Frameless systems represent the pinnacle of modern, minimalist bathroom design. By eliminating heavy perimeter metal, these enclosures rely entirely on heavy architectural glass secured by discreet, high-grade metal clips and heavy-duty hinges.

The primary benefits of frameless glass shower doors include an unobstructed sightline that makes even compact bathrooms feel expansive and bright. Because there are no bulky metal channels to trap moisture, frameless systems dramatically reduce places where mildew and soap scum can accumulate. However, because the glass panels must support their own structural load and the mechanical movement of the door, they require substantial tempered panels—typically 3/8-inch or 1/2-inch thick—anchored securely into solid wall framing or blocking.

Semi-Frameless and Framed Glass Shower Enclosure Designs

Semi-frameless models present an appealing middle ground. These units usually incorporate metal framing around the perimeter of the entire stall or along stationary panels, while leaving the operable door edges frameless or minimal. This configuration offers a sleek contemporary aesthetic while utilizing perimeter metal to help manage minor wall out-of-plumb conditions.

Fully framed enclosures feature aluminum channeling encasing every edge of every glass panel. Because the metal frame carries the structural load, these enclosures utilize thinner glass panels, typically around 5/32-inch to 1/4-inch thick. Framed enclosures provide excellent mechanical water containment thanks to full-perimeter gaskets and magnetic seals, making them a dependable, classic option for high-traffic family bathrooms.

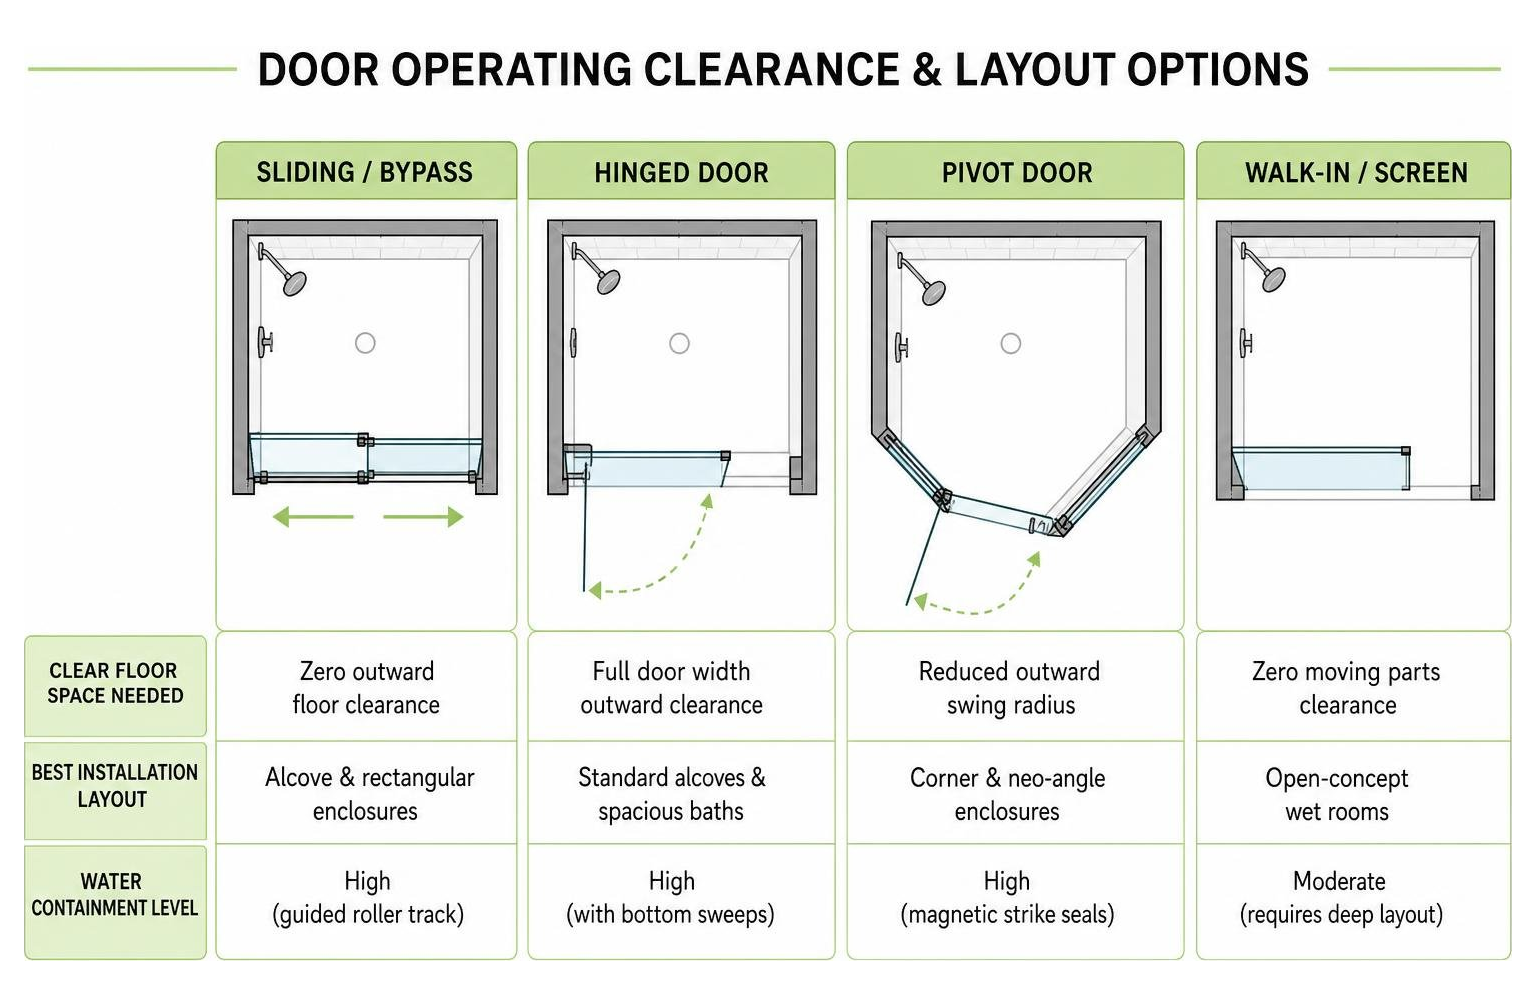
Enclosure Layouts and Door Operating Mechanics

The right door mechanism depends on your available floor space, the position of surrounding fixtures like vanities or toilets, and your overall design goals. Choosing stationary glass shower panels in combination with a well-engineered door ensures effortless daily entry and exit without splashing water across your dry zone.

Door Mechanism Clear Floor Space Needed Best Installation Layout Water Containment Level
Sliding / Bypass Zero outward floor clearance Alcove & rectangular enclosures High (guided roller track)
Hinged Door Full door width outward clearance Standard alcoves & spacious baths High (with bottom sweeps)
Pivot Door Reduced outward swing radius Corner & neo-angle enclosures High (magnetic strike seals)
Walk-In / Screen Zero moving parts clearance Open-concept wet rooms Moderate (requires deep layout)

door operating clearance and layout options diagram

Sliding and Bypass Door Systems

For bathrooms where floor space is at a premium, sliding shower doors are an exceptional solution. Modern sliding systems utilize top-mounted barn-door rollers or precision ball-bearing tracks that allow panels to glide silently past one another without requiring any outward swing clearance.

Bypass designs allow both panels to slide independently, giving you convenient access to the plumbing controls from either side of the stall. Single-slider systems pair one stationary glass panel with one operable sliding panel, maximizing structural rigidity while delivering smooth, quiet operation.

Pivot and Hinged Door Systems

Pivot and hinged doors swing outward (and occasionally inward) into the bathroom space. A side-mounted hinged door attaches directly to the wall or to an adjacent glass panel using heavy-duty brass or stainless steel hinges. These provide a wide, welcoming entryway with minimal visual obstruction.

Pivot doors rotate on top and bottom pivot pins located slightly inward from the door edge. This inward pivot point reduces the outward swing arc of the door, making it an excellent choice for neo-angle corner enclosures and spaces where a standard hinged door might bump into a vanity or towel bar.

Glass Specifications, Safety Standards, and Hardware Finishes

tempered shower door hardware finishes in matte black brushed nickel and chrome

Safety and durability are fundamental when selecting shower glass. Modern building codes require that all shower glass be tempered safety glass. During the tempering process, the glass is heated to extreme temperatures and rapidly cooled, creating high surface compression that makes the glass four to five times stronger than standard annealed glass.

When searching for quality glass, always ensure the material complies with rigorous architectural safety glazing standards, such as those verified by the Safety Glazing Certification Council. For example, high-performance systems utilize premium SGCC-certified tempered glass specifications that ensure if an impact ever causes breakage, the glass crumbles into small, blunt granular chunks rather than dangerous, jagged shards. Exploring recent shower glass innovations will help you find the right combination of safety, clarity, and protective treatments.

Glass Textures and Surface Treatments

Your choice of glass texture sets the tone for light transmission and visual privacy:

  • Ultra-Clear (Low-Iron) Glass: Removes the natural greenish tint found in standard clear glass, offering pure color clarity that showcases intricate tilework.
  • Clear Tempered Glass: The timeless, versatile standard that maximizes light flow and opens up smaller rooms visually.
  • Frosted / Acid-Etched Glass: Provides consistent, high-level privacy by diffusing light softly throughout the shower stall.
  • Rain & Patterned Glass: Features tactile exterior textures that obscure interior sightlines while masking water droplets and fingerprints.
  • Factory-Applied Protective Coatings: Hydrophobic coatings bond to the glass surface microscopically, causing water to bead up and roll off while repelling hard water minerals and soap scum.

Hardware Finish Selection and Corrosion Resistance

Shower hardware must withstand continuous humidity, warm moisture, and chemical exposure from body washes and cleaning sprays. Solid forged brass and surgical-grade stainless steel provide the highest level of corrosion resistance.

Popular finishes include:

  • Matte Black: Delivers crisp, industrial contrast that pairs beautifully with modern and transitional aesthetics.
  • Brushed Nickel: A warm, resilient finish that naturally resists water spots and fingerprints.
  • Polished Chrome: A reflective, classic finish that complements standard bathroom fixtures.
  • Oil-Rubbed Bronze: Offers deep, rustic tones ideal for traditional or Mediterranean-inspired spaces.

How to Measure, Maintain, and Plan for Professional Installation

Achieving a watertight, rattle-free shower stall requires extreme precision during the measuring and planning phases. Even newly built bathrooms frequently feature walls that taper outward or shower curbs that slope unevenly. Investing in custom frameless showers Chicago guarantees that every piece of glass is cut to match the exact angles and contours of your space.

Precision Measurement Techniques

When preparing to measure your shower enclosure, adhere to these standard steps:

  1. Wait for Finished Surfaces: Never measure rough framing or cement board. Always take measurements only after all tile, stone, or solid surfaces are completely installed.
  2. Take Three Width Measurements: Measure the horizontal opening at the shower curb (bottom), the midpoint (around 36 inches up), and the top height (typically 72 to 76 inches).
  3. Verify Plumb and Level: Use a long spirit level or laser level against both vertical walls to detect any out-of-plumb bowing or leaning.
  4. Inspect Curb Slope: Confirm that the threshold curb slopes slightly inward toward the shower drain (approximately 3/16-inch slope) so water drains back into the pan rather than out onto the bathroom floor.

Routine Care and Long-Term Glass Maintenance

Keeping your shower sparkling requires straightforward, consistent habits:

  • Daily Squeegee Routine: Spend 30 seconds after your shower wiping down the panels with a silicone squeegee to prevent mineral scale buildup.
  • Non-Abrasive Cleaning: Use mild, pH-neutral cleaners or a diluted solution of water and white vinegar. Avoid abrasive scouring pads, bleach, or ammonia-based sprays that can erode hardware seals and protective glass coatings.
  • Microfiber Detailing: Wipe down metal handles, hinges, and roller tracks with a dry microfiber cloth to keep hardware free of water spots.
  • Hardware Inspection: Periodically check hinge screws and handle fasteners to ensure everything remains securely torqued.

Frequently Asked Questions About Glass Shower Doors

Frameless enclosures typically require 3/8-inch (10mm) or 1/2-inch (12mm) tempered glass. The 3/8-inch thickness provides the structural rigidity required for doors and stationary panels while keeping the weight manageable. For expansive, oversized panels or ultra-luxury installations, 1/2-inch glass offers unmatched heft, deflection resistance, and a solid feel.

How do I prevent water from leaking out of my shower enclosure?

Preventing water escape requires a combination of proper engineering and targeted seals. Ensuring your shower curb slopes inward toward the drain is the first line of defense. High-quality bottom door sweeps, clear polycarbonate side-jamb seals, and magnetic closure strips contain overspray. Additionally, positioning the showerhead so water does not spray directly at door seams significantly enhances containment.

Can a glass shower door be installed on out-of-plumb walls?

Yes. While pre-fabricated off-the-shelf kits struggle with uneven surfaces, custom fabrication allows glass panels to be precision-cut with matching tapers. Professional installers measure the exact degree of wall lean and cut the glass out-of-square to create clean, uniform gaps and a watertight seal without ugly shims.

Conclusion

A well-chosen shower enclosure elevates daily routines while transforming the visual elegance of your bathroom. From sleek sliding tracks to bold frameless designs, taking the time to match frame styles, safety-certified glass, and resilient hardware to your layout ensures decades of dependable performance.

At JP Precision Glass, we specialize in precision, made-to-size custom glass solutions tailored to the unique architecture of your home. When you are ready to upgrade your bathroom, explore our expert services for Shower Doors Chicago to schedule your custom design consultation.

American Standard walk in shower

Step into Luxury with an American Standard Walk-In Shower Setup

Choose a Sleek, Flexible American Standard Walk-In Shower

An American Standard walk-in shower can be built around the space, style, and access needs of your bathroom. Start with the core enclosure pieces – a shower base, wall panels, and a door or fixed glass panel – then choose the shower controls, trim, and showerhead that fit how you bathe.

For a Chicago remodel, the practical choice often comes down to these details:

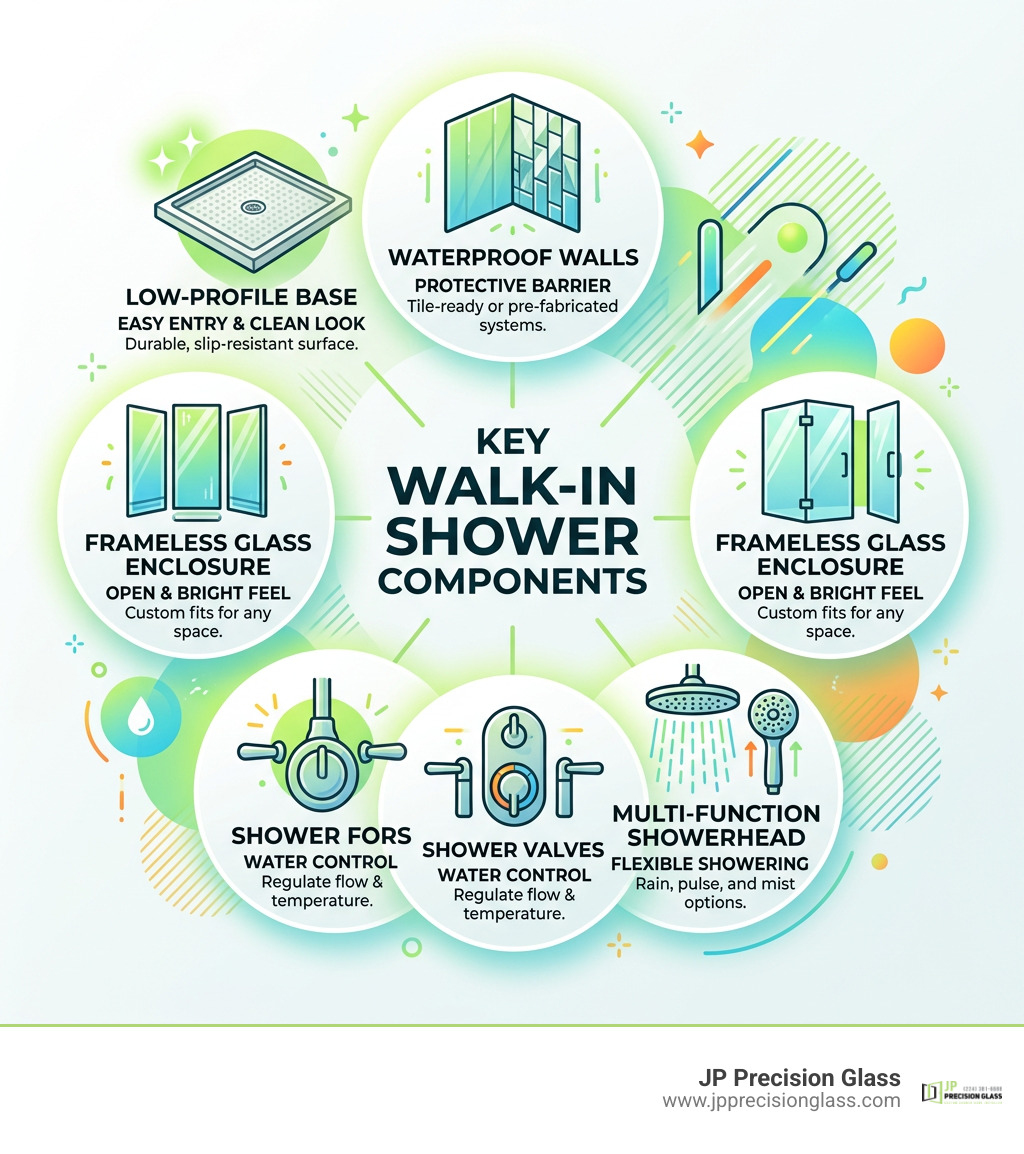
  • Low-profile base for easier entry and a clean look
  • Waterproof wall system or tile-ready surround
  • Frameless custom glass to keep the room bright and open
  • Hand shower or multi-function showerhead for added reach and flexibility
  • Doorless, sliding, or hinged enclosure based on available clearance

American Standard offers shower components in modular categories, including bases, doors, walls, valves, showerheads, and complete shower systems. That approach lets you create a polished setup without treating every bathroom like it has the same dimensions.

Walk-in shower components: base walls glass enclosure valves and showerhead infographic

American standard walk in shower word guide:

Key Features of an American Standard Walk-In Shower

Creating an ideal bathing space involves balancing aesthetics, functionality, and long-term durability. American Standard simplifies this journey by categorizing shower solutions into intuitive, modular groups: Trim and Valves, Shower Heads, and Complete Shower Systems. This modular philosophy means you can easily customize each layer of your shower experience to meet your specific household routines.

Modern walk-in systems prioritize seamless temperature control, water efficiency, and customized spray options. Pressure-balancing shower valves ensure that sudden changes in household water usage—such as a running washing machine—never cause unexpected temperature spikes. Pairing these advanced internal valves with sleek trim plates provides tactile, effortless flow control, giving you a smooth transition between gentle rinsing and invigorating body sprays.

Additionally, multi-function spray heads and rain shower combinations bring a spa-inspired atmosphere straight into your home. Integrated flow restrictors deliver a rich, drenching spray while supporting responsible water conservation.

Components of an American Standard Walk-In Shower System

When selecting components, taking a systematic approach ensures that plumbing hardware aligns perfectly with your daily habits. By reviewing a comprehensive guide to comparing walk in shower options, you can match your space with high-performance fixtures tailored to your home.

The essential hardware elements include:

  • Shower Valves and Rough-Ins: The functional heart behind the wall, regulating water pressure and balancing hot and cold supply lines safely.
  • Trim Packages: The exterior dials, levers, and escutcheon plates available in finishes like polished chrome, brushed nickel, and matte black.
  • Overhead and Rain Shower Heads: Broad spray faces that simulate natural rainfall for full-body coverage.
  • Handheld Sprayers with Slide Bars: Adjustable wands that offer flexibility for targeted rinsing, assisted bathing, and easy enclosure cleaning.

Modular plumbing assembly and water valve system

Shower Bases, Wall Panels, and Enclosures

The physical structure of your shower enclosure requires durable surfaces that actively resist moisture buildup while providing safe footing. American Standard provides low-profile shower bases engineered with textured, slip-resistant floor patterns that offer dependable grip underfoot without feeling abrasive.

Textured shower base and waterproof wall surrounds

Surrounding wall panels and waterproof backer systems eliminate the heavy maintenance demands of traditional grout lines. These non-porous acrylic and solid surface walls come in clean, smooth designs as well as embossed, tile-look patterns that deliver classic charm without the scrubbing.

To complete the enclosure, pairing durable walls with modern glass creates an airy, illuminated interior. Exploring our glass shower doors a comprehensive guide to types comparison helps clarify whether a sliding bypass door, a pivot door, or a minimalist walk-in glass screen best suits your structural footprint.

Walk-In Showers vs. Walk-In Tubs: Choosing Your Safety and Accessibility Solution

Selecting between a walk-in shower and a walk-in bathtub depends on your personal mobility goals, available space, and preferred relaxation style. Both options enhance bathroom accessibility, yet they serve distinct daily routines.

Walk-in showers provide an open environment with zero or ultra-low entry barriers, making them ideal for aging in place, roll-in wheelchair access, and quick daily hygiene. Conversely, walk-in bathtubs cater to those who desire deep, seated soaking to soothe aching joints and muscles.

Therapeutic Bath Features and Jet Options

For homeowners who favor seated hydrotherapy over standing showers, American Standard walk-in tubs provide targeted wellness features. Therapeutic jet configurations turn ordinary baths into restorative experiences:

  1. Whirlpool Massage Systems: High-pressure water jets target the lumbar region, legs, and back to ease deep muscle tension.
  2. Air Spa Systems: Up to 21 gentle air jets release thousands of warm bubbles, delivering a gentle, full-body effervescence.
  3. Combination Hydrotherapy: Units like the Gelcoat Value Series 30 x 60 -Inch Walk-in Tub With Combination Air Sp merge water and air massage for a comprehensive at-home spa experience.
  4. Chromatherapy: Submerged multi-colored LED lighting creates a tranquil visual ambiance to relieve evening stress.

Low-Threshold Entry, Quick Drain, and Safety Features

Safety is engineered directly into accessible fixtures. Walk-in tubs feature watertight, outward- or inward-opening doors with ultra-low entry thresholds, built-in contoured seating, and integrated safety grab bars.

A frequent frustration with traditional walk-in tubs is the chilly wait for water to recede before opening the door. American Standard solves this with its patented Quick Drain® technology, an internal pump system that empties a full tub in less than two minutes without requiring dedicated auxiliary plumbing. When combined with textured, slip-resistant floors, these fixtures protect independence across every stage of life.

Material and Configuration Options for Modern Bathrooms

Bathroom renovations must balance structural requirements with aesthetic choices. Choosing the right construction materials and plumbing layouts ensures your shower or tub functions flawlessly within your room’s exact boundaries.

Gelcoat vs. Acrylic Durability and Finishes

American Standard builds accessible fixtures and shower components using two proven materials: fiberglass-backed Gelcoat and reinforced Acrylic.

Designing an American Standard Walk-In Shower Layout for Any Bathroom Size

Whether you are updating a compact urban guest bath or creating an expansive primary suite, layout planning dictates your daily comfort.

Space-efficient walk-in shower configuration

Plumbing alignment is critical. Fixtures are manufactured in dedicated left-hand and right-hand drain configurations to align directly with existing home pipework, avoiding unnecessary structural concrete cutting or joist modifications. Retrofit extender kits also allow shorter 48-inch or 52-inch units to neatly fill standard 60-inch tub alcove pockets.

For space-conscious spaces, reviewing big style small footprint 8 inspiring 3×5 walk in shower designs reveals how to optimize smaller footprints with smart drain and valve placement. If your floor plan allows for a larger footprint, learning how to design a spacious 2 person walk in shower will help you arrange dual shower heads, bench seating, and custom glass partitions without crowding.

Customizing Your Enclosure with Premium Glass Doors

While modular walls and functional bases establish the foundation of your shower, custom glass determines its final visual impact. Heavy glass enclosures turn a standard shower tray into an open, luminous retreat.

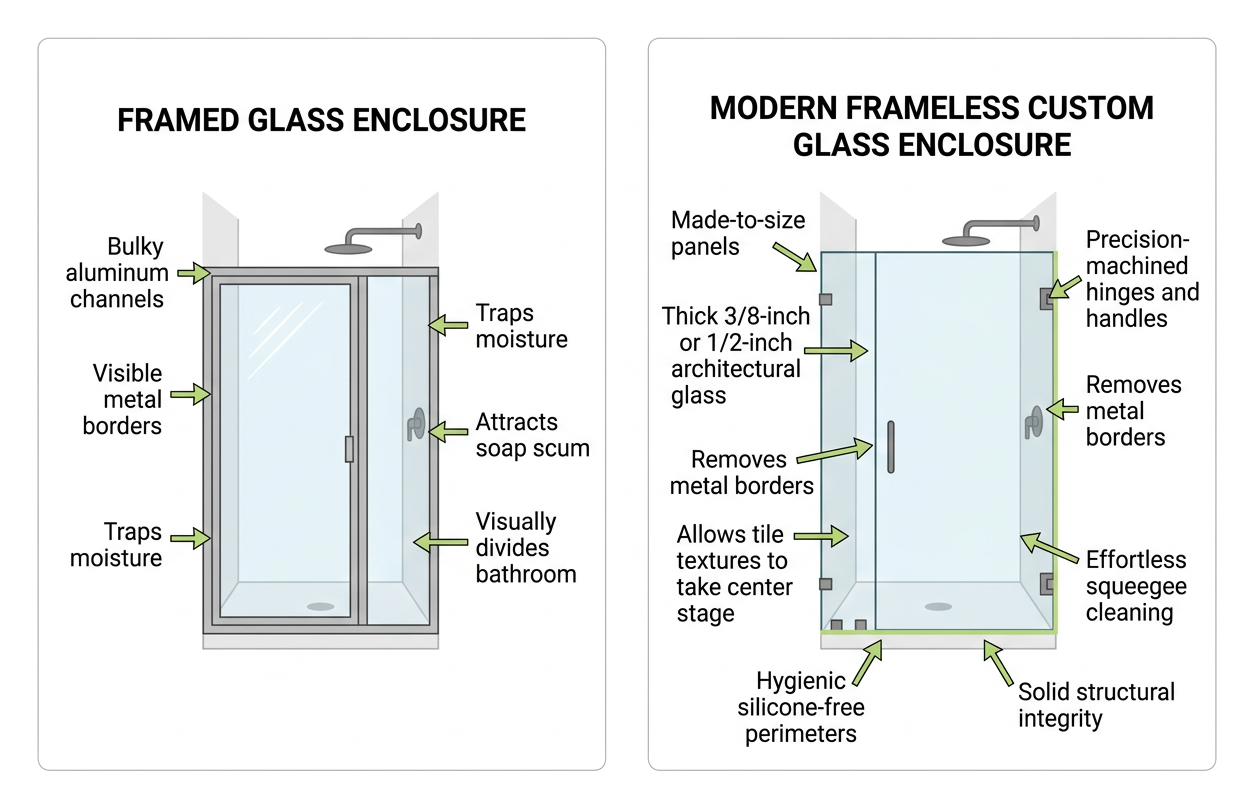
Comparison between framed glass and modern frameless custom glass enclosure

Frameless Glass vs. Traditional Enclosures

Old-fashioned framed shower doors rely on bulky aluminum channels that trap moisture, attract soap scum, and visually divide a bathroom. Upgrading to frameless tempered glass removes these metal borders, allowing tile textures, accent lighting, and elegant plumbing fixtures to take center stage.

Homeowners appreciate the practical benefits of frameless glass shower doors, which include effortless squeegee cleaning, hygienic silicone-free perimeters, and solid structural integrity. We fabricate made-to-size panels using thick 3/8-inch or 1/2-inch architectural glass paired with precision-machined hinges and handles. To explore tailored enclosures for your layout, explore our custom shower door chicago solutions.

Sizing Panels for Compact and Spacious Layouts

In open walk-in layouts, a fixed glass partition can direct water spray while keeping the entrance entirely door-free. This creates an accessible, barrier-free passage ideal for all age groups.

Selecting the right partition width prevents water from escaping into the dry zones of your bathroom. Installing architectural glass shower panels provides a clean, continuous shield against overspray while maintaining an open feel.

For smaller layouts, discover why a 36 glass shower panel is the perfect fit for compact walk in showers, as this dimension offers the ideal balance between splash containment and comfortable walk-in clearance. For larger, intricate configurations requiring sliding glass or pivoting returns, our team delivers custom shower doors chicago homeowners trust for precise alignment and watertight performance.

Frequently Asked Questions about Walk-In Showers and Tubs

What warranties are offered on tub and shower components?

American Standard backs its walk-in products with dedicated multi-tier warranty protection:

  • Door Seal: Protected by a comprehensive lifetime warranty, ensuring the watertight seal never leaks or fails over time.
  • Tub Shell: Supported by a 10-year warranty covering structural integrity and surface performance.
  • Mechanical and Electrical Components: Pumps, operating controls, air blowers, and faucets carry a 5-year parts warranty.

How quickly does the Quick Drain system empty a tub?

The patented Quick Drain® system uses an internal evacuation pump to clear water in under two minutes under standard plumbing conditions. This fast drainage eliminates the long, cold wait associated with gravity-drained tubs, letting bathers exit safely and promptly after soaking.

Where can I purchase and get professional installation?

American Standard shower and bath components can be sourced through certified plumbing distributors, authorized showroom partners, and major home improvement retailers. Because accessible systems require precise waterproofing, leveling, and drainage alignment, professional installation by licensed plumbing and glass specialists is strongly recommended to protect your investment and preserve warranty coverage.

Conclusion

Upgrading your bathroom with a walk-in shower or accessible tub combines everyday safety with clean, modern design. From low-entry bases and therapeutic hydrotherapy systems to rapid-draining pumps, these thoughtfully designed fixtures support independent living while enhancing daily comfort.

At JP Precision Glass, we complement your bathroom renovation by designing, fabricating, and installing custom frameless glass enclosures made to your exact measurements. Our tailored approach ensures crisp sightlines, smooth operation, and lasting beauty. Connect with us to explore our custom frameless showers chicago services and design your custom glass enclosure today.

10mm frameless shower screen

Everything You Need to Know Before Buying a 10mm Frameless Shower Screen

Why a 10mm Frameless Shower Screen Is the Smart Choice for Modern Bathrooms

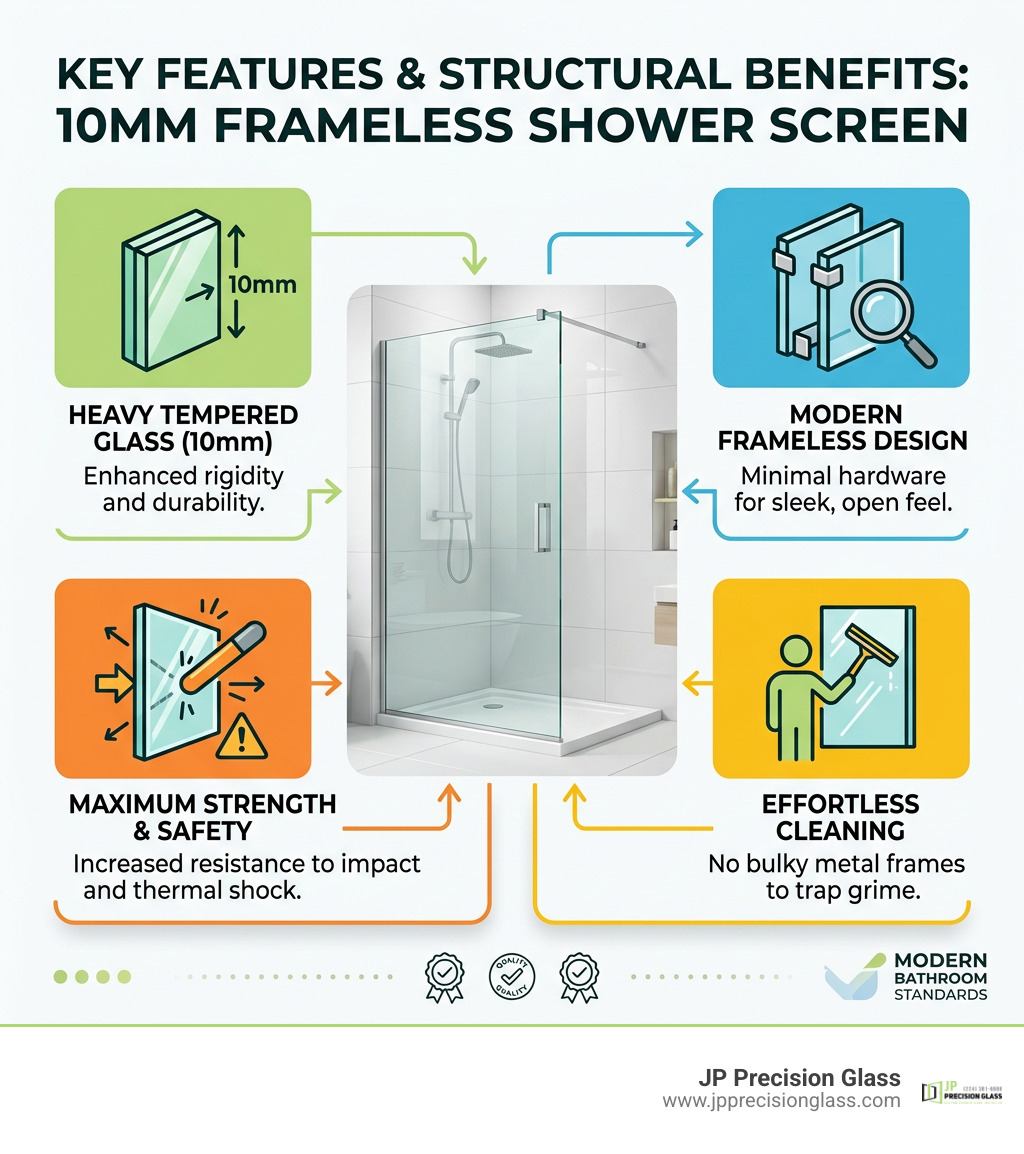
A 10mm frameless shower screen (3/8-inch heavy tempered glass) provides a sleek, modern enclosure without bulky aluminum frames. It is the premier standard for contemporary walk-in showers and alcoves, delivering three core benefits:

  • Maximum rigidity: 10mm tempered glass supports its own weight with discreet metal clamps, eliminating the flex and wobble seen in thinner panels.
  • Enhanced safety: Heavy-duty ANSI-certified glass withstands high impact and thermal shock while maintaining clean sightlines.
  • Effortless cleaning: Removing metal perimeter channels eliminates the damp crevices where soap scum, grime, and mold typically build up.

Upgrading your bathroom should make your space feel larger, brighter, and easier to maintain. A frameless 10mm glass panel gives you the clean lines of an open-concept wet room with the dependable strength needed for everyday family use.

Key features and structural benefits of a 10mm frameless shower screen infographic

10mm frameless shower screen terms simplified:

Why Choose a 10mm Frameless Shower Screen for Modern Bathrooms?

Sleek frameless walk-in shower panel anchored with discreet wall clamps

When designing a contemporary bathroom, eliminating visual clutter is paramount. Traditional framed shower doors rely on thick perimeter channels that box in the space, trap moisture, and collect mineral deposits. Exploring the benefits of frameless glass shower doors reveals why homeowners gravitate toward frameless enclosures: they let natural light flow freely across tile patterns and architectural features while creating an uninterrupted sightline.

The structural secret behind this minimalist look is glass thickness. A 10mm panel delivers self-supporting rigidity, allowing you to anchor the glass directly into walls and shower bases using low-profile brackets or slim floor channels.

Beyond aesthetics, moving to a fully frameless system improves hygiene. By getting rid of damp aluminum tracks and rubber gaskets where mold and bacteria thrive, maintenance becomes as simple as a quick swipe with a squeegee.

Key Advantages of a 10mm Frameless Shower Screen Over Thinner Glass

Many entry-level shower kits rely on 6mm (1/4-inch) or 8mm (5/16-inch) glass. While lighter and easier to ship, thinner glass exhibits noticeable flex when opened, closed, or bumped.

When evaluating options in our guide to types & comparison of glass shower doors, 10mm (3/8-inch) stands out as the sweet spot between structural integrity and everyday usability. It offers a solid, substantial feel without placing excessive mechanical strain on high-grade hinges and wall anchors.

Feature / Specification 6mm (1/4″) Glass 8mm (5/16″) Glass 10mm (3/8″) Heavy Glass
Structural Frame Requirement Full perimeter frame required Semi-frameless or light frameless 100% frameless with clamps
Deflection & Wobble High flex; easily bends Moderate stability Negligible flex; firm feel
Weight per Square Foot ~3.1 lbs ~4.1 lbs ~5.2 lbs
Impact Resistance Moderate High Superior heavy-duty durability
Best Fit Application Budget rentals, slider kits Mid-range alcoves Luxury walk-ins, custom enclosures

Safety Ratings and Explosion-Proof Film Protection

Safety in wet environments is essential. High-grade 10mm architectural glass undergoes a thermal tempering process, heating the glass to over 1,100°F (600°C) and rapidly cooling it with high-pressure air blasts. This creates deep surface compression, producing safety glass certified under standards like ANSI Z97.1 and international benchmarks like Australia’s AS2208.

If standard float glass breaks, it creates dangerous, jagged shards. Tempered glass fractures into small, blunt, dice-sized pebbles.

Thermal tempering and explosion-proof film safety mechanism

Many modern premium panels feature an invisible explosion-proof safety film adhered to the exterior surface. If an extreme impact occurs, this micro-thin laminate holds the glass fragments intact within the panel plane, preventing scattering across the bathroom floor.

Comparing Glass Thickness and Design Options

Selecting the right glass involves balancing transparency, light diffusion, and privacy. The advantages of glass shower walls extend beyond simple open designs to include customized glass treatments:

  • Standard Clear Float Glass: Excellent clarity with a subtle, natural greenish tint along the polished edges due to natural iron content.
  • Ultra-Clear Low-Iron Glass: Purified during manufacturing to eliminate the green hue, delivering true-to-life color rendering for intricate marble, mosaic, or subway tile.
  • Frosted & Acid-Etched Glass: Provides visual privacy while allowing soft, diffused daylight to penetrate the enclosure.

Sizing and Layout Options for a 10mm Frameless Shower Screen

Shower spaces come in all shapes and sizes. Whether you are selecting 32-inch glass shower doors for a space-conscious guest bath or planning a compact walk-in shower layout using 36-inch glass panels, standard heights typically range from 72 to 80 inches (1800mm to 2000mm).

Off-the-shelf single panels—such as the Scudo 10mm clear glass shower panel—work well for walk-in wet rooms. For corner enclosures, options like the 900 x 900mm frameless glass shower screen combine return panels with hinged doors to maximize floor space.

Aesthetic Profiles, French Grids, and Easy-Clean Surface Coatings

Modern finishes allow your shower screen to anchor your bathroom’s overall design aesthetic:

  • Hydrophobic Easy-Clean Coatings: Microscopic silica-based sealants fill the microscopic pores of the glass surface. Water beads up and rolls off, preventing limescale buildup and soap scum adhesion.
  • French Grid Patterns: Silkscreened or ceramic-fused matte black exterior lines deliver an industrial, modern look while keeping the interior glass smooth for effortless squeegeeing.
  • Bracing Bars: For wider walk-in panels (exceeding 36 inches), a matching ceiling or wall-mounted stabilization bar provides solid reinforcement without cluttering sightlines.

To explore the latest treatment options, check out recent shower glass innovations.

Hardware Selection and Waterproofing Essentials

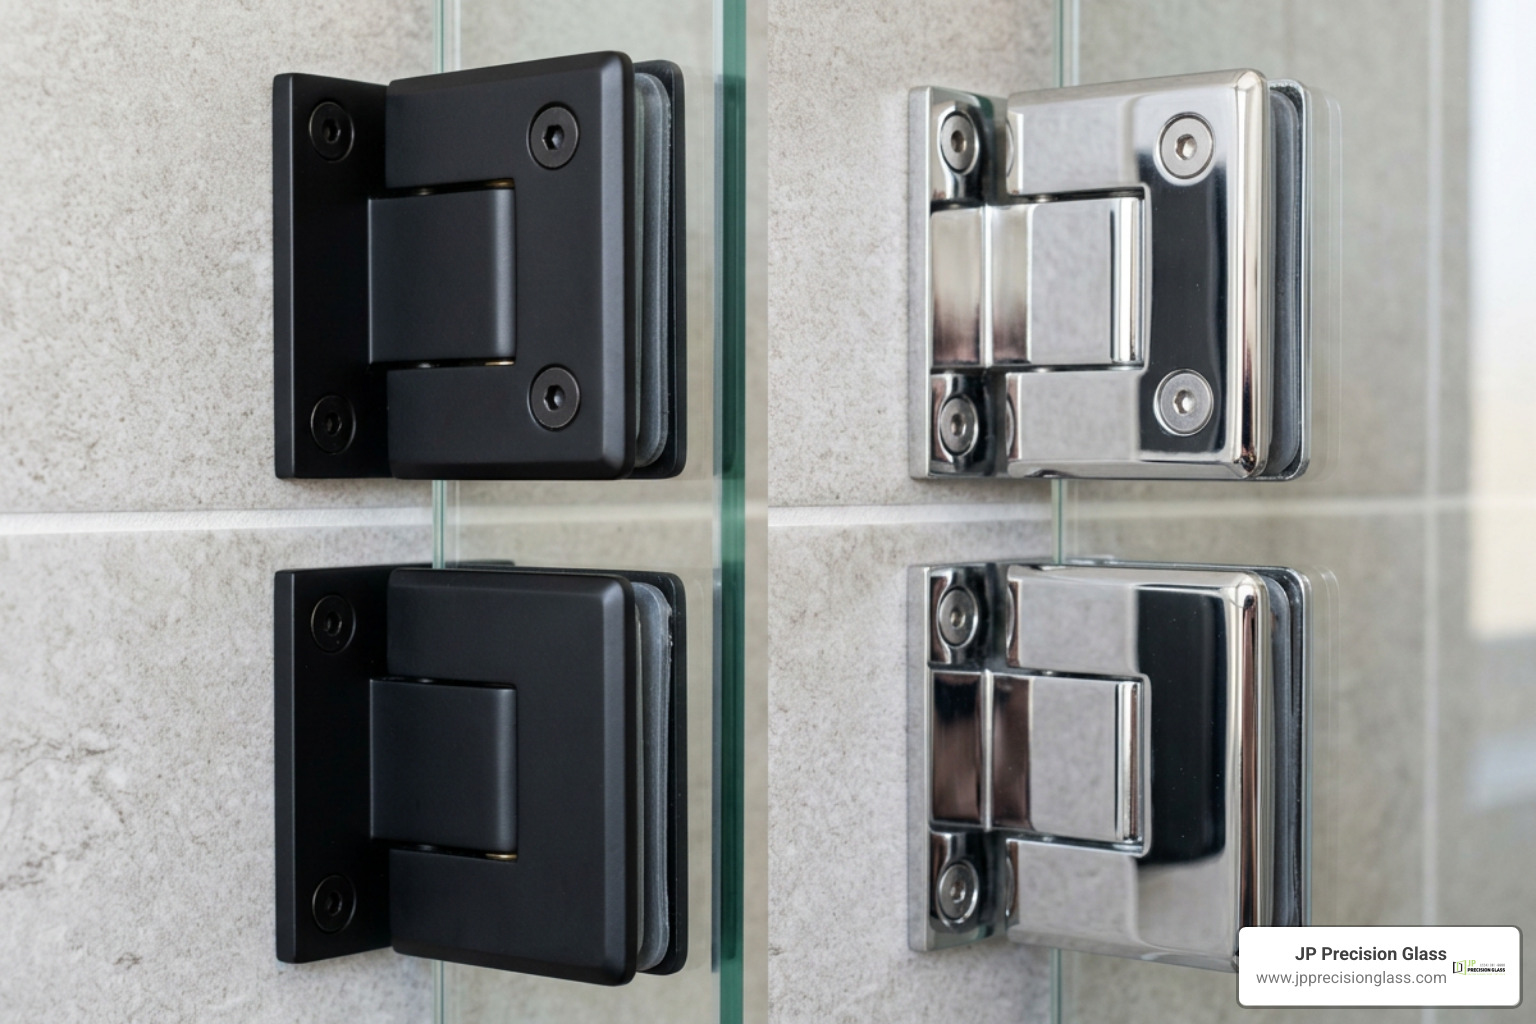
Solid brass and stainless steel mounting clamps in matte black and chrome finishes

Because frameless screens lack aluminum framing, their structural stability depends entirely on the mounting hardware. High-traffic residential installations require heavy-duty components made from solid forged brass or 304/316 marine-grade stainless steel to resist rust and corrosion.

Whether configuring single walk-in shields or learning how to design a spacious 2-person walk-in shower, matching your hardware finishes—such as matte black, brushed nickel, polished chrome, or satin brass—creates a cohesive look across your fixtures.

Water Seals, Floor Strips, and Wet-Dry Separation

A frameless screen achieves clean lines while keeping water contained using precise sealing components:

  • Translucent Vertical Seals: Polycarbonate strips clip onto the vertical edges of door panels to close gaps without detracting from the open look.
  • Bottom Drip Sweeps: Dual-durometer sweeps with flexible lower fins channel water back toward the shower drain.
  • Low-Profile Floor Deflection Strips: Sleek acrylic or metallic threshold dams mounted directly to the curb prevent surface water from escaping.
  • High-Grade Sanitary Silicone: Mildew-resistant clear silicone applied along fixed glass-to-tile junctions creates a lasting watertight seal.

Installation Requirements and Professional Fitting Considerations

Installing a 10mm frameless glass screen requires careful handling and precision. A standard 36×78-inch panel weighs roughly 65 to 75 pounds (30 to 35 kg). Handling this weight while positioning the glass against finished tile demands dual-cup suction lifters and multiple people.

Key installation steps include:

  1. Wall Stud Reinforcement: Screws must anchor securely into solid wood studs or reinforced backing behind finished drywall and tile.
  2. Managing Out-of-Plumb Walls: Frameless glass cannot flex to hide uneven walls. Installers must take precise laser measurements to cut custom glass or make minor clamp adjustments to keep gaps uniform.
  3. Universal Handing: Many standalone panels feature reversible handing, allowing mounting on either the left or right wall depending on your plumbing layout.

Reviewing a comprehensive guide to compare and buy shower glass panels helps clarify the technical aspects of installation. For homeowners seeking tailored configurations, our team at JP Precision Glass provides dedicated support for custom frameless showers in Chicago, ensuring every panel is custom-measured, fabricated, and installed securely.

Frequently Asked Questions About Frameless Shower Screens

Is 10mm glass strong enough to be installed completely frameless?

Yes. 10mm (3/8-inch) tempered glass is the standard for frameless showers because its thickness resists bending under load. When paired with high-grade solid brass or stainless steel clamps, it provides a stable, self-supporting barrier that complies with ANSI Z97.1 safety criteria.

Can a 10mm shower screen be installed on any bathroom floor?

10mm frameless panels can be installed on curbless wet-room floors, pre-formed acrylic shower pans, or custom-tiled curbs. The key requirement is an adequate floor slope (typically 1/4 inch per foot) directing water toward the drain to prevent pooling near the glass edges.

How do you prevent water from leaking around a frameless screen?

Effective water containment combines proper shower head placement with targeted seal profiles. Direct shower heads inward toward tiled walls rather than toward open glass seams, use bottom sweeps with integrated drip rails, and apply mildew-resistant silicone along all fixed glass junctions.

Conclusion

Upgrading your bathroom with heavy architectural glass adds lasting comfort, clean modern style, and everyday functionality. Its solid feel, simple maintenance, and transparent design make it a rewarding improvement for any home renovation.

At JP Precision Glass, we deliver precision, made-to-measure solutions backed by high-quality materials and professional installation across the Chicago area. Explore our full range of custom glass shower panels to find the right fit for your home.